ShopDreamUp AI ArtDreamUp
Deviation Actions


Suggested Deviants


Suggested Collections


![Yu-gi-oh! Series9 MSE Template v1.1 [UPDATE 2-Jan]](https://images-wixmp-ed30a86b8c4ca887773594c2.wixmp.com/i/910e2b86-48f3-4018-9147-10d3a8688458/d8bye6w-5f29acbb-90c2-48ed-b8f1-19a1cd521803.png/v1/crop/w_184,h_184,x_15,y_0,scl_0.25555555555556/yu_gi_oh__series9_mse_template_v1_1__update_2_jan__by_celticguard_d8bye6w-92s-2x.png)
![Yu-gi-oh! Series9 MSE Template v1.1 [UPDATE 2-Jan]](https://images-wixmp-ed30a86b8c4ca887773594c2.wixmp.com/i/910e2b86-48f3-4018-9147-10d3a8688458/d8bye6w-5f29acbb-90c2-48ed-b8f1-19a1cd521803.png/v1/crop/w_92,h_92,x_7,y_0,scl_0.12777777777778/yu_gi_oh__series9_mse_template_v1_1__update_2_jan__by_celticguard_d8bye6w-92s.png)


You Might Like…


Featured in Groups

Description
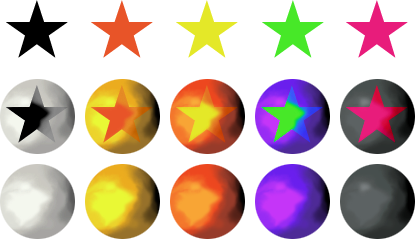
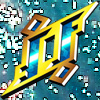
Someone requested this. Not perfect, but should work well enough for custom Level types. The template only includes the normal (middle) base—the recolors in the preview are only examples of what you could do with it.
INSTRUCTIONS:
Use "Image - Adjustments - Hue/Saturation" to change the colors (don't check "Colorize").
When recoloring the base orb, recolor these layers with the same settings: Base, Shading, Highlight, and Star Saturate 1
When recoloring the star, recolor these layers with the same settings: Star (back), Star (front), and Star Saturate 2
(Some changes may be required. "Image - Adjustments - Levels" can help restore lost shadows if you brightened it, or highlights if you darkened it.)
- - -
Want to add your own custom symbol instead of the default star? Here's how:
- - -
Yu-Gi-Oh! is ©1996 Kazuki Takahashi.
INSTRUCTIONS:
Use "Image - Adjustments - Hue/Saturation" to change the colors (don't check "Colorize").
When recoloring the base orb, recolor these layers with the same settings: Base, Shading, Highlight, and Star Saturate 1
When recoloring the star, recolor these layers with the same settings: Star (back), Star (front), and Star Saturate 2
(Some changes may be required. "Image - Adjustments - Levels" can help restore lost shadows if you brightened it, or highlights if you darkened it.)
- - -
Want to add your own custom symbol instead of the default star? Here's how:
- Un-clip all the layers by holding option/alt with the curser between the "Base" and "Star (back)" layers and clicking.
- Hide every layer with "Star" in its name.
- Select the "Star (back)" layer (keep it hidden). Paste, scale, and position your new symbol (must be opaque and have a transparent background). Do a Color Overlay layer style with yellow (#dde222). Create a new blank layer, then merge it with this layer to flatten the layer style. Name this layer "New Symbol (back)."
- Duplicate the New Symbol (back) layer 3 times and drag the copies above the "Highlight" layer. Name these layers "New Symbol 1," " New Symbol 2," and "New Symbol 3" (down to up).
- Duplicate the "Shading" layer and drag the copy above "Symbol 1." With the curser between these layers, hold option/alt and click to clip the shading to the star. Select both layers and merge them. Change the blending mode to Overlay and opacity to 30%. Name this layer "New Symbol Saturate 1."
- Select the "New Symbol 2" layer. Change the opacity to 25%. Using the "Shading" layer as a guide, erase the parts covered by the darker shadows to the right with a size 13 soft brush (30% opacity). Rename this layer "New Symbol (front)"
- Select the "New Symbol 3" layer. Change the blending mode to Saturation. Rename this layer "New Symbol Saturate 2."
- Hold option/alt and click between each layer (starting at the bottom) to clip all the layers to the base circle.
- Be sure to save the file (as a PSD), then recolor it as desired.
- - -
Yu-Gi-Oh! is ©1996 Kazuki Takahashi.
Image size
75x75px 80.96 KB
© 2016 - 2024 icycatelf
Comments13
Join the community to add your comment. Already a deviant? Log In
Can I use this for a full Series 3 Template? This is the only old level template I'm finding.